2026-05-23
How to automate Gmail with OpenClaw
A practical guide to connecting Gmail to OpenClaw with Google OAuth Client JSON, configuring gog, completing authorization, and launching an AI agent for email automation.
Gmail remains one of the main tools for daily work: it receives leads, service notifications, client emails, invoices, job replies, security alerts, and dozens of promotional emails. The problem is that your inbox can quickly turn into a stream of noise.
An AI agent can take over part of this routine: find important emails, group incoming messages, prepare reply drafts, track specific topics, check service notifications, and help you avoid missing critical messages.
One way to do this is to connect Gmail to OpenClaw through a Google Workspace skill called gog. It is important to understand that gog is not just an instruction for the agent. It is a CLI tool that must be installed in the same environment where OpenClaw is running. In this article, we will break down how this integration works, why Google Cloud is needed, what an OAuth JSON file is, which steps are required for connection, and why a ready-made agent environment can be easier than manual installation.
What is OpenClaw?
OpenClaw is an open-source environment for running AI agents. Such an agent can work through Telegram or other channels, execute commands, use skills, access external services, and run as a persistent server process.
To put it simply, OpenClaw is not just a chatbot. It is an environment where AI gets access to tools: files, APIs, CLI commands, a browser, calendar, email, and other services.
For Gmail automation, OpenClaw is not the final goal by itself. It acts as an agent runtime: the place where the agent lives, receives your commands, and calls the Google integration.
What is gog and why is it needed?
To connect Google Workspace to OpenClaw, the gog skill is used — an integration for working with Google services.
In the case of Gmail, gog allows the agent to perform actions such as:
- searching emails;
- reading the inbox;
- finding unread messages;
- grouping emails by topic;
- creating drafts;
- helping with replies;
- working with labels;
- checking recent threads.
Important: gog is not just a “plugin in the interface.” It is a CLI tool that must be installed in the environment where OpenClaw is running. If you only have a Telegram chat with an agent, but no server access or command execution, the agent can set up Gmail only if there is a real OpenClaw environment behind Telegram with permission to run commands and save files.
Why Gmail needs OAuth JSON, not an API key
A common mistake is to think that Gmail only requires creating an API key and passing it to the agent as JSON.
That does not work for Gmail.
Google APIs use OAuth 2.0 to access user data. This means the application does not receive your Gmail password. Instead, you create an OAuth client, complete authorization through Google, grant permissions, and the system receives an access token and refresh token.
In practice, you do not work with a JSON file like this:
{
  "api_key": "your_api_key"
}
You work with an OAuth Client JSON file like this:
{
  "installed": {
    "client_id": "your-client-id.apps.googleusercontent.com",
    "project_id": "your-project-id",
    "auth_uri": "https://accounts.google.com/o/oauth2/auth",
    "token_uri": "https://oauth2.googleapis.com/token",
    "auth_provider_x509_cert_url": "https://www.googleapis.com/oauth2/v1/certs",
    "client_secret": "your-client-secret",
    "redirect_uris": [
      "http://localhost"
    ]
  }
}
This file is needed so gog can start OAuth authorization and connect the Gmail account to the agent.
How to install the gog CLI for OpenClaw
Before connecting Gmail, you need to make sure that the OpenClaw environment has not only the gog skill, but also the actual executable gog CLI tool.
This is important: sometimes the skills directory contains only a SKILL.md file, meaning an instruction for the agent, but the actual gog binary is not installed in the system. In that case, commands like:
gog auth credentials ...
gog auth add ...
will not work, because the server simply does not know the gog command.
You can check whether gog is installed with:
which gog
gog --version
If the command is not found, gog needs to be installed manually. Below is an example install script for a Linux server. It downloads the latest gogcli release from GitHub Releases, selects the correct build for the server architecture, and places the binary into ~/.local/bin.
mkdir -p ~/.local/bin
cd /tmp

python3 - <<'PY' > /tmp/gog_url.txt
import json
import urllib.request
import platform

arch = platform.machine()

if arch == "x86_64":
    target = "linux_amd64.tar.gz"
elif arch in ("aarch64", "arm64"):
    target = "linux_arm64.tar.gz"
else:
    raise SystemExit(f"Unsupported arch: {arch}")

data = json.load(urllib.request.urlopen("https://api.github.com/repos/openclaw/gogcli/releases/latest"))

for asset in data["assets"]:
    name = asset["name"]
    if name.endswith(target):
        print(asset["browser_download_url"])
        break
else:
    raise SystemExit(f"No asset found for {target}")
PY

URL=$(cat /tmp/gog_url.txt)
echo "Downloading: $URL"

curl -L "$URL" -o /tmp/gogcli.tar.gz

rm -rf /tmp/gogcli-extract
mkdir -p /tmp/gogcli-extract

tar -xzf /tmp/gogcli.tar.gz -C /tmp/gogcli-extract

find /tmp/gogcli-extract -type f -name gog -exec cp {} ~/.local/bin/gog \;

chmod +x ~/.local/bin/gog

export PATH="$HOME/.local/bin:$PATH"

which gog
gog --version
After successful installation, the command should return the binary path and version:
/home/USER/.local/bin/gog
gog version ...
If gog is installed in ~/.local/bin, it is important to add that directory to PATH for the same environment where the OpenClaw agent runs. Otherwise, gog may work in a manual SSH session, while the Telegram/OpenClaw agent still cannot call it.
For the current session, this is enough:
export PATH="$HOME/.local/bin:$PATH"For permanent usage, it is better to add the PATH variable to the startup or environment configuration of the OpenClaw service.
After installation, you can proceed to connecting the OAuth JSON file:
gog auth credentials ~/.config/openclaw/secrets/google-oauth-client.jsonImportant: the setup must be performed under the same Linux user that actually runs the OpenClaw agent.
The ~/.config path depends on the user:
If OpenClaw runs as root, the file will be located here:
/root/.config/openclaw/secrets/google-oauth-client.jsonIf OpenClaw runs as the openclaw user, the file will be located here:
/home/openclaw/.config/openclaw/secrets/google-oauth-client.jsonThis is critical. If you configured gog under root, but the Telegram/OpenClaw agent runs under the openclaw user, everything may work in a manual SSH session, but the agent itself will not see the credentials, keyring, and tokens.
Before setup, check:
whoami
echo $HOME
which gog
gog --version
General flow for connecting Gmail to OpenClaw
The process looks like this:
- Create a Google Cloud Project.
- Configure the OAuth Consent Screen.
- Create an OAuth Client JSON file.
- Transfer the OAuth JSON file to the OpenClaw environment.
- Configure the keyring password before OAuth.
- Start Gmail OAuth through the remote flow.
- Verify that Gmail is connected.
- Verify that the setup survives a new session.
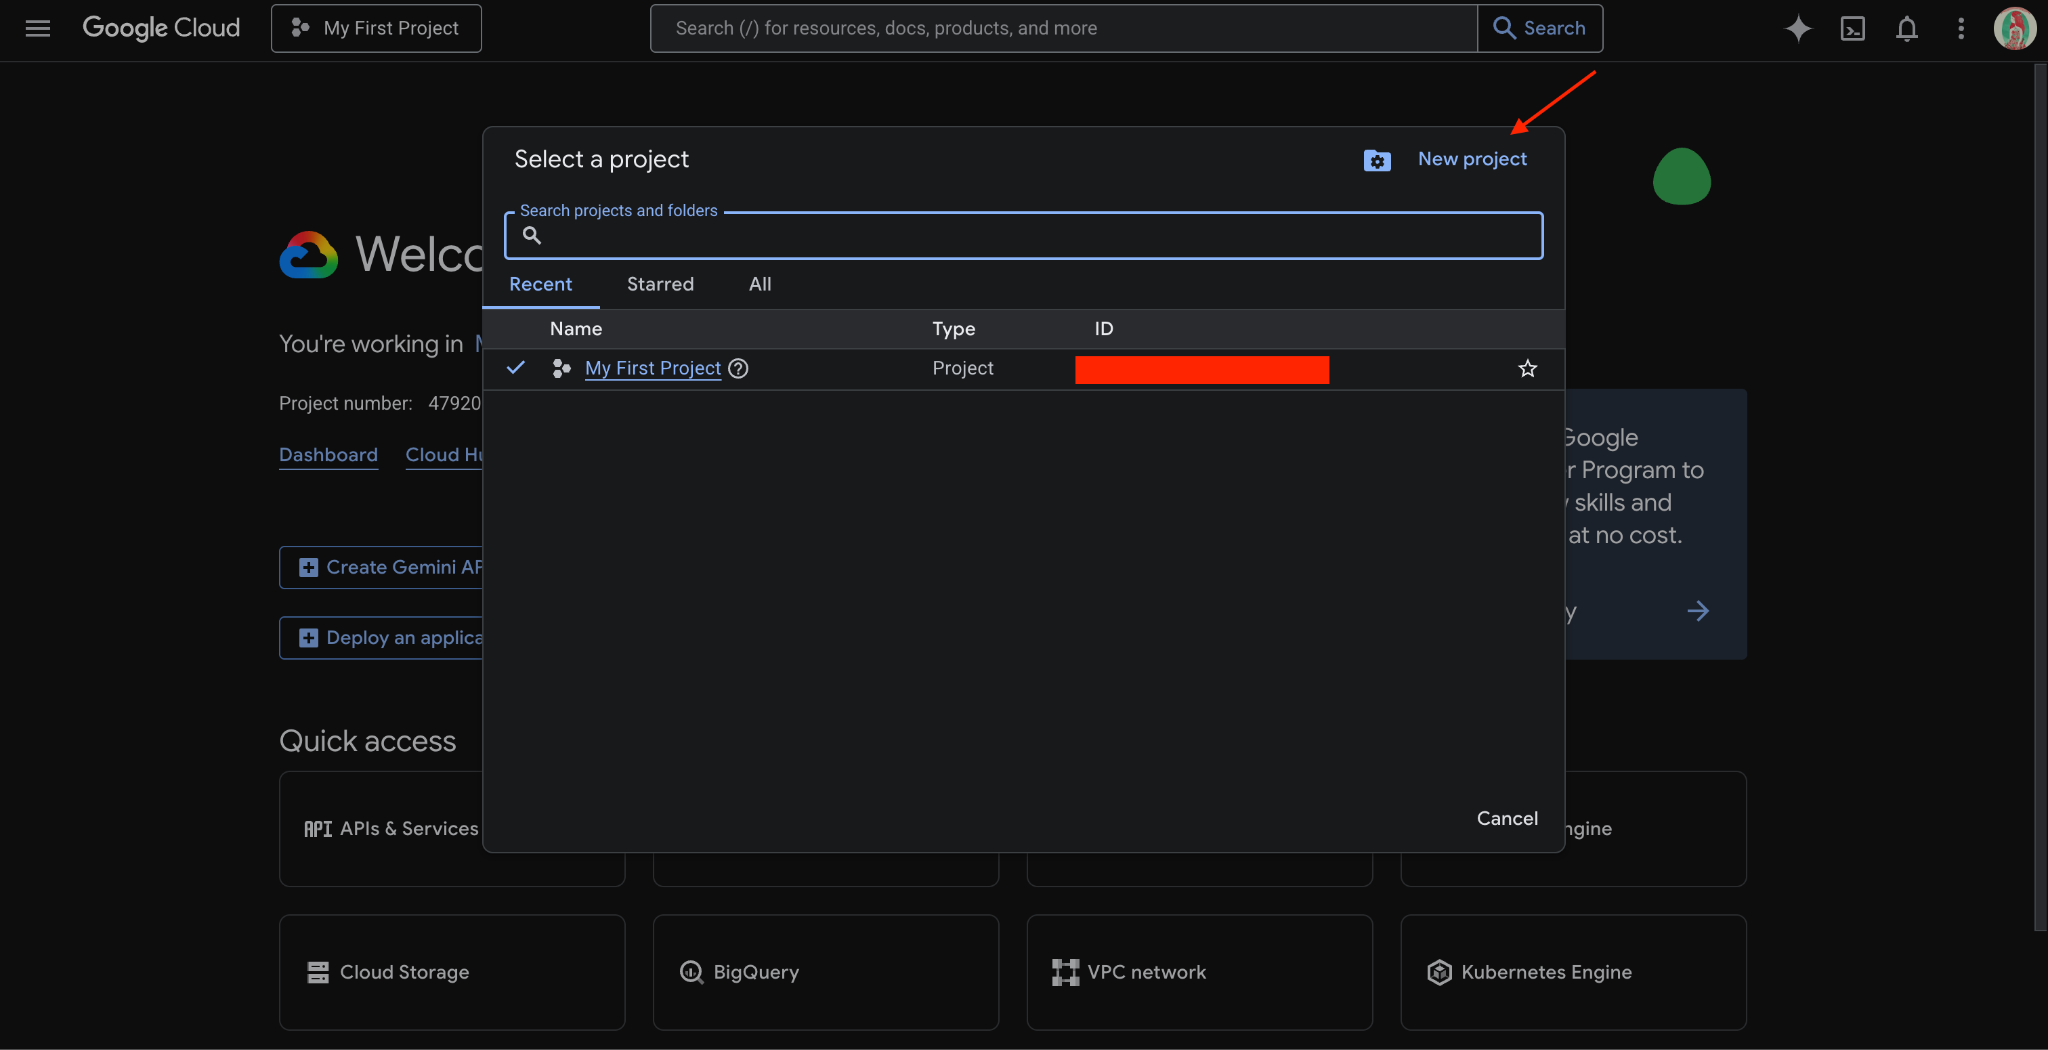
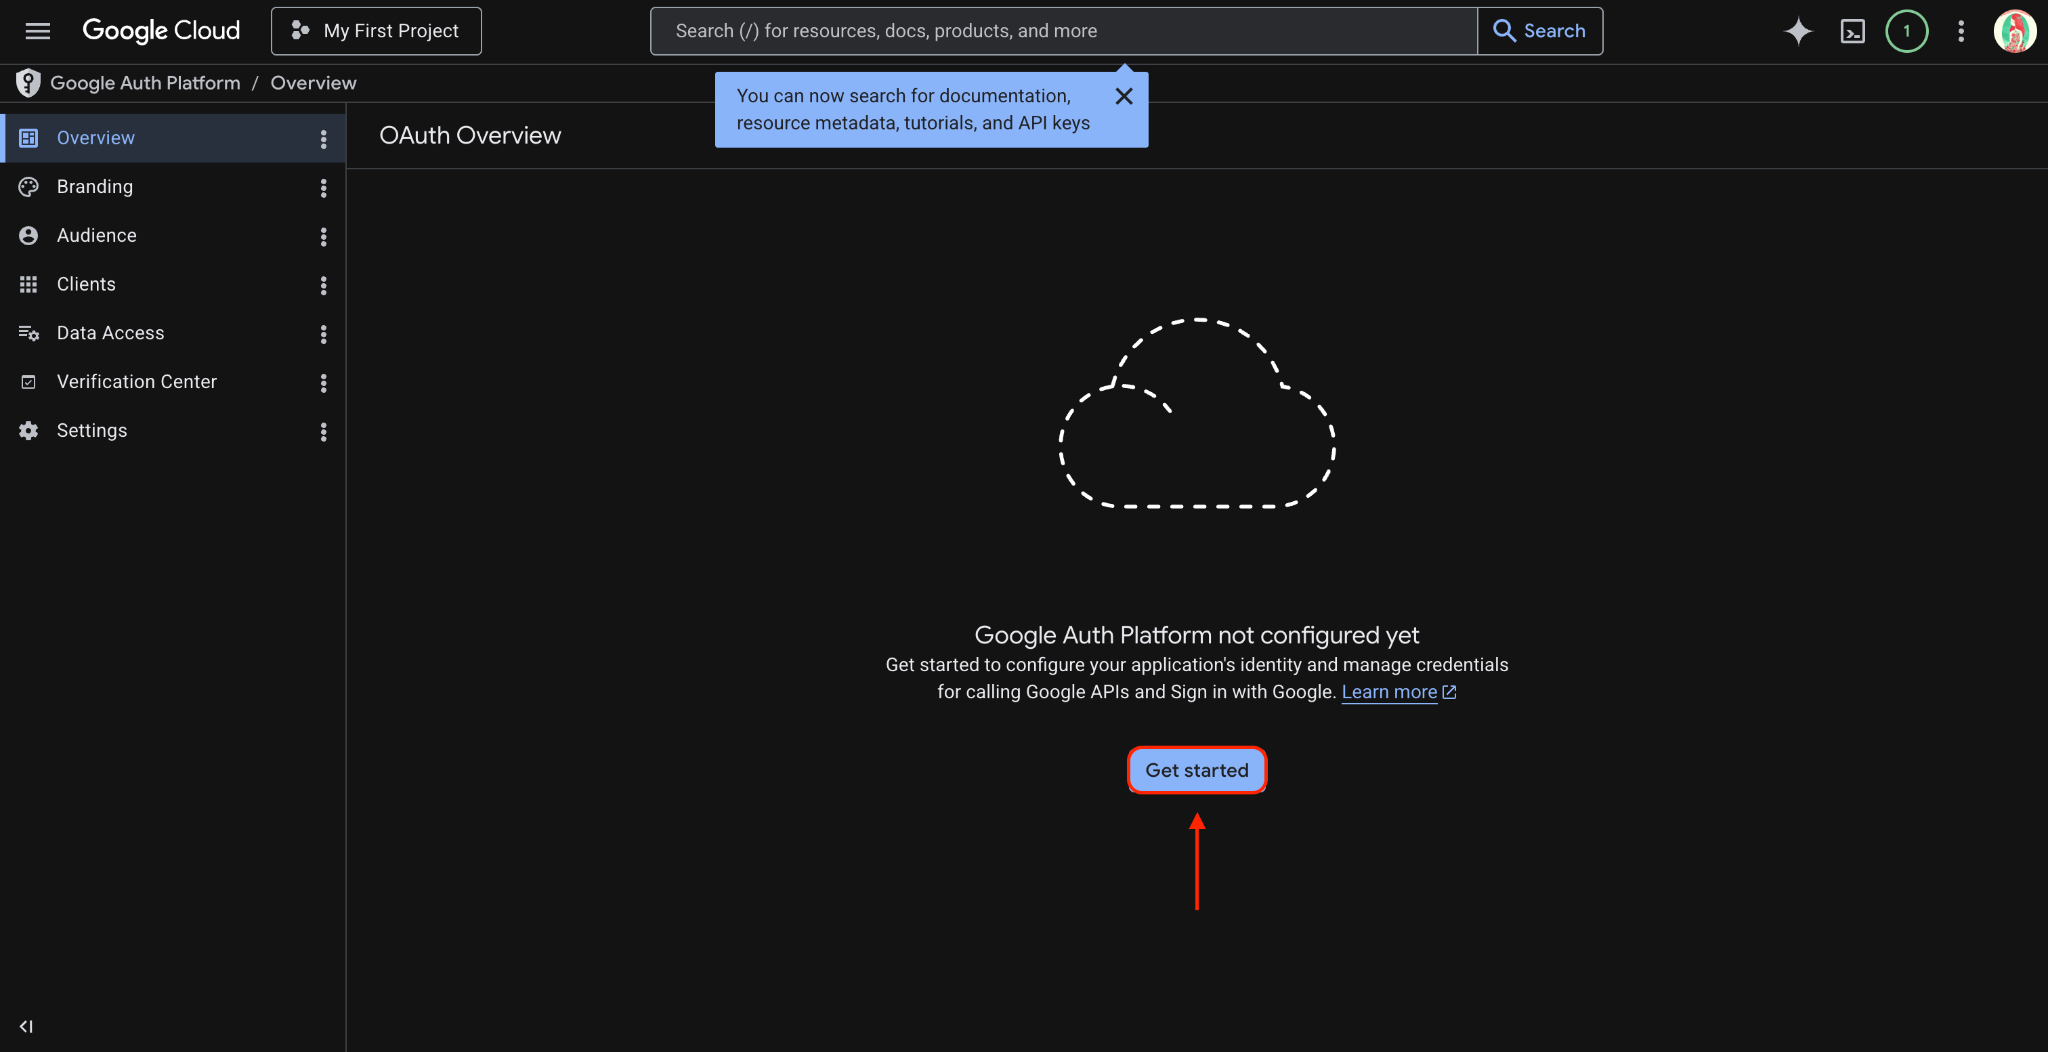
Step 1. Create a Google Cloud Project
First, go to Google Cloud Console and create a separate project for Gmail automation.
It is better not to use a shared project that already contains other services. A separate project is easier to control, easier to disable, and easier to delete if something goes wrong.
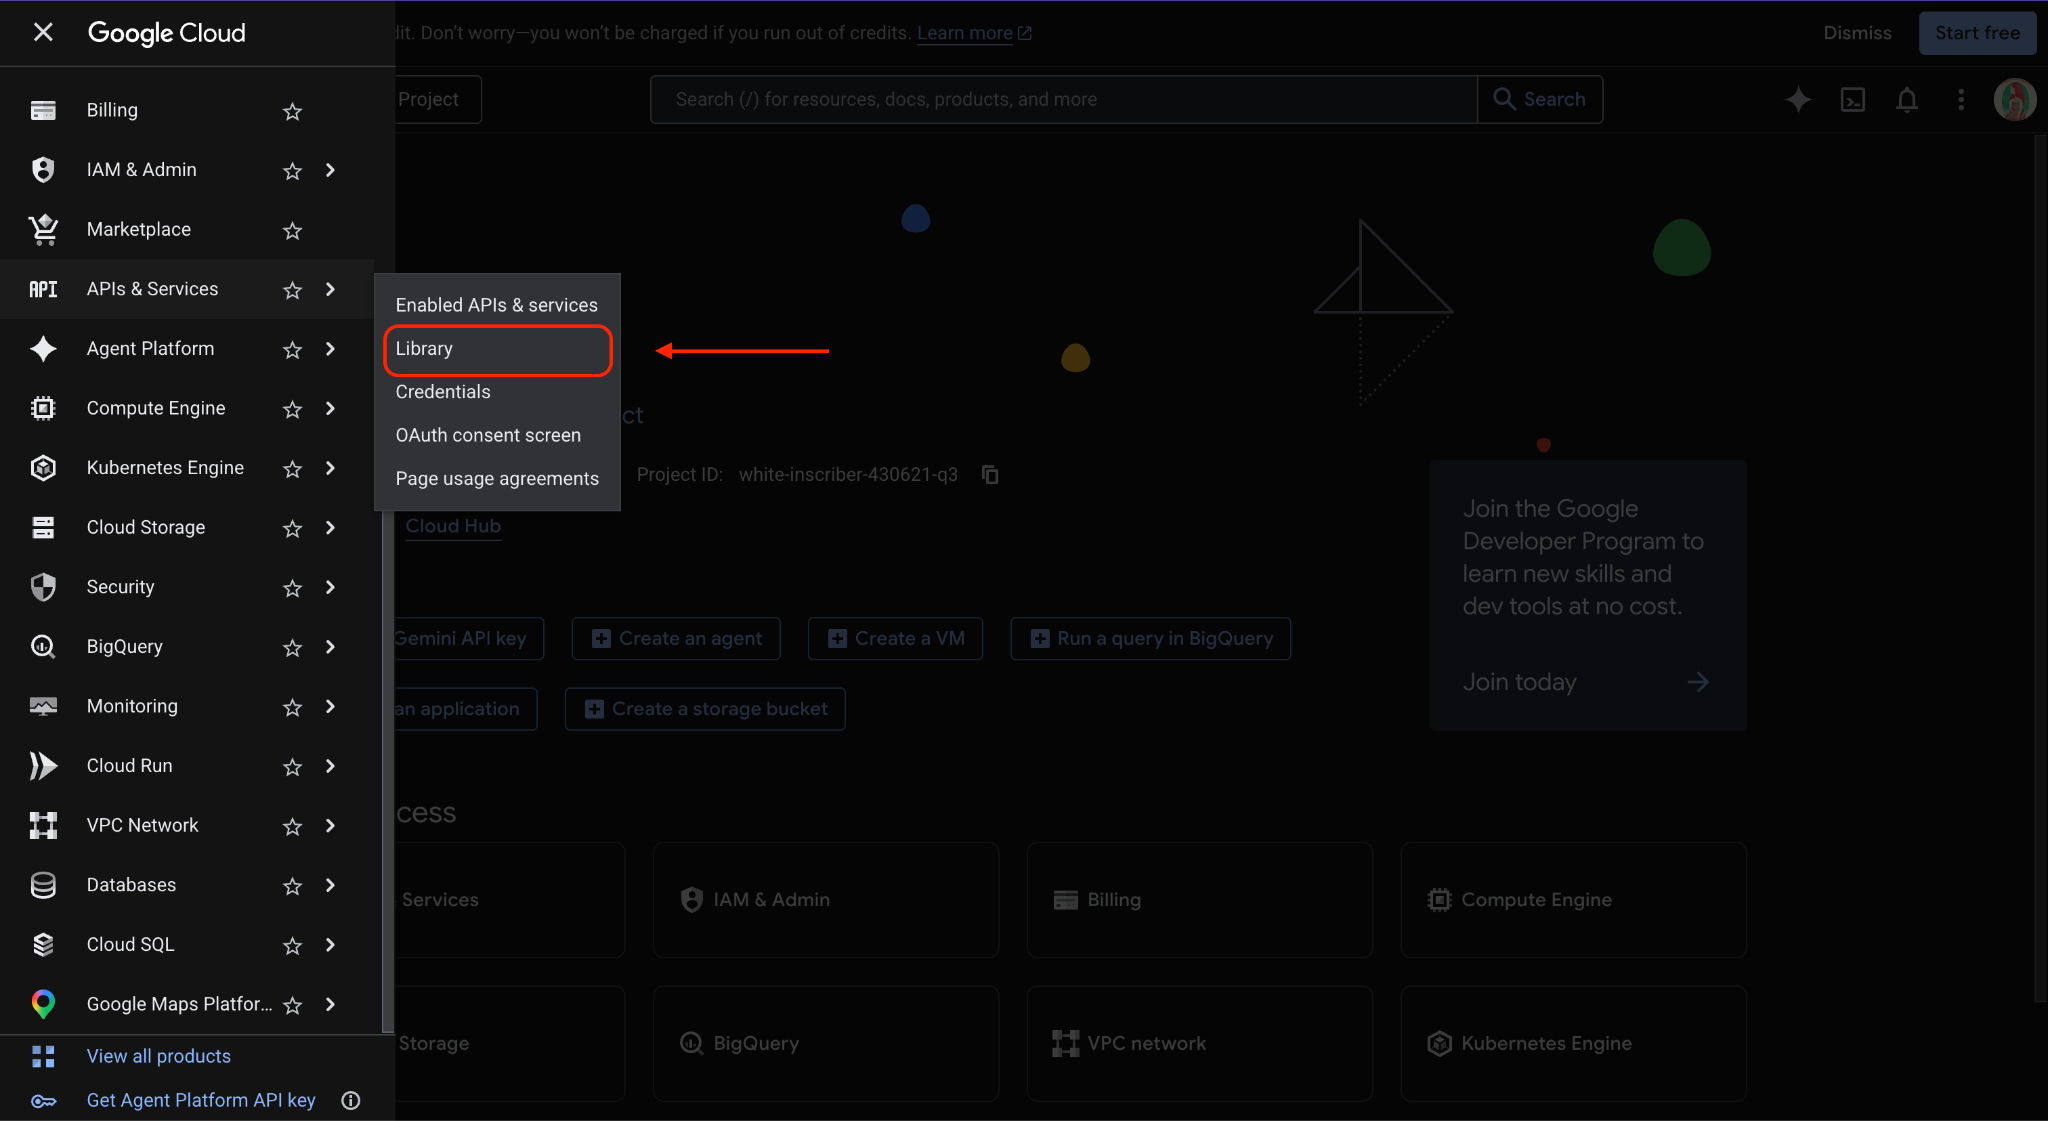
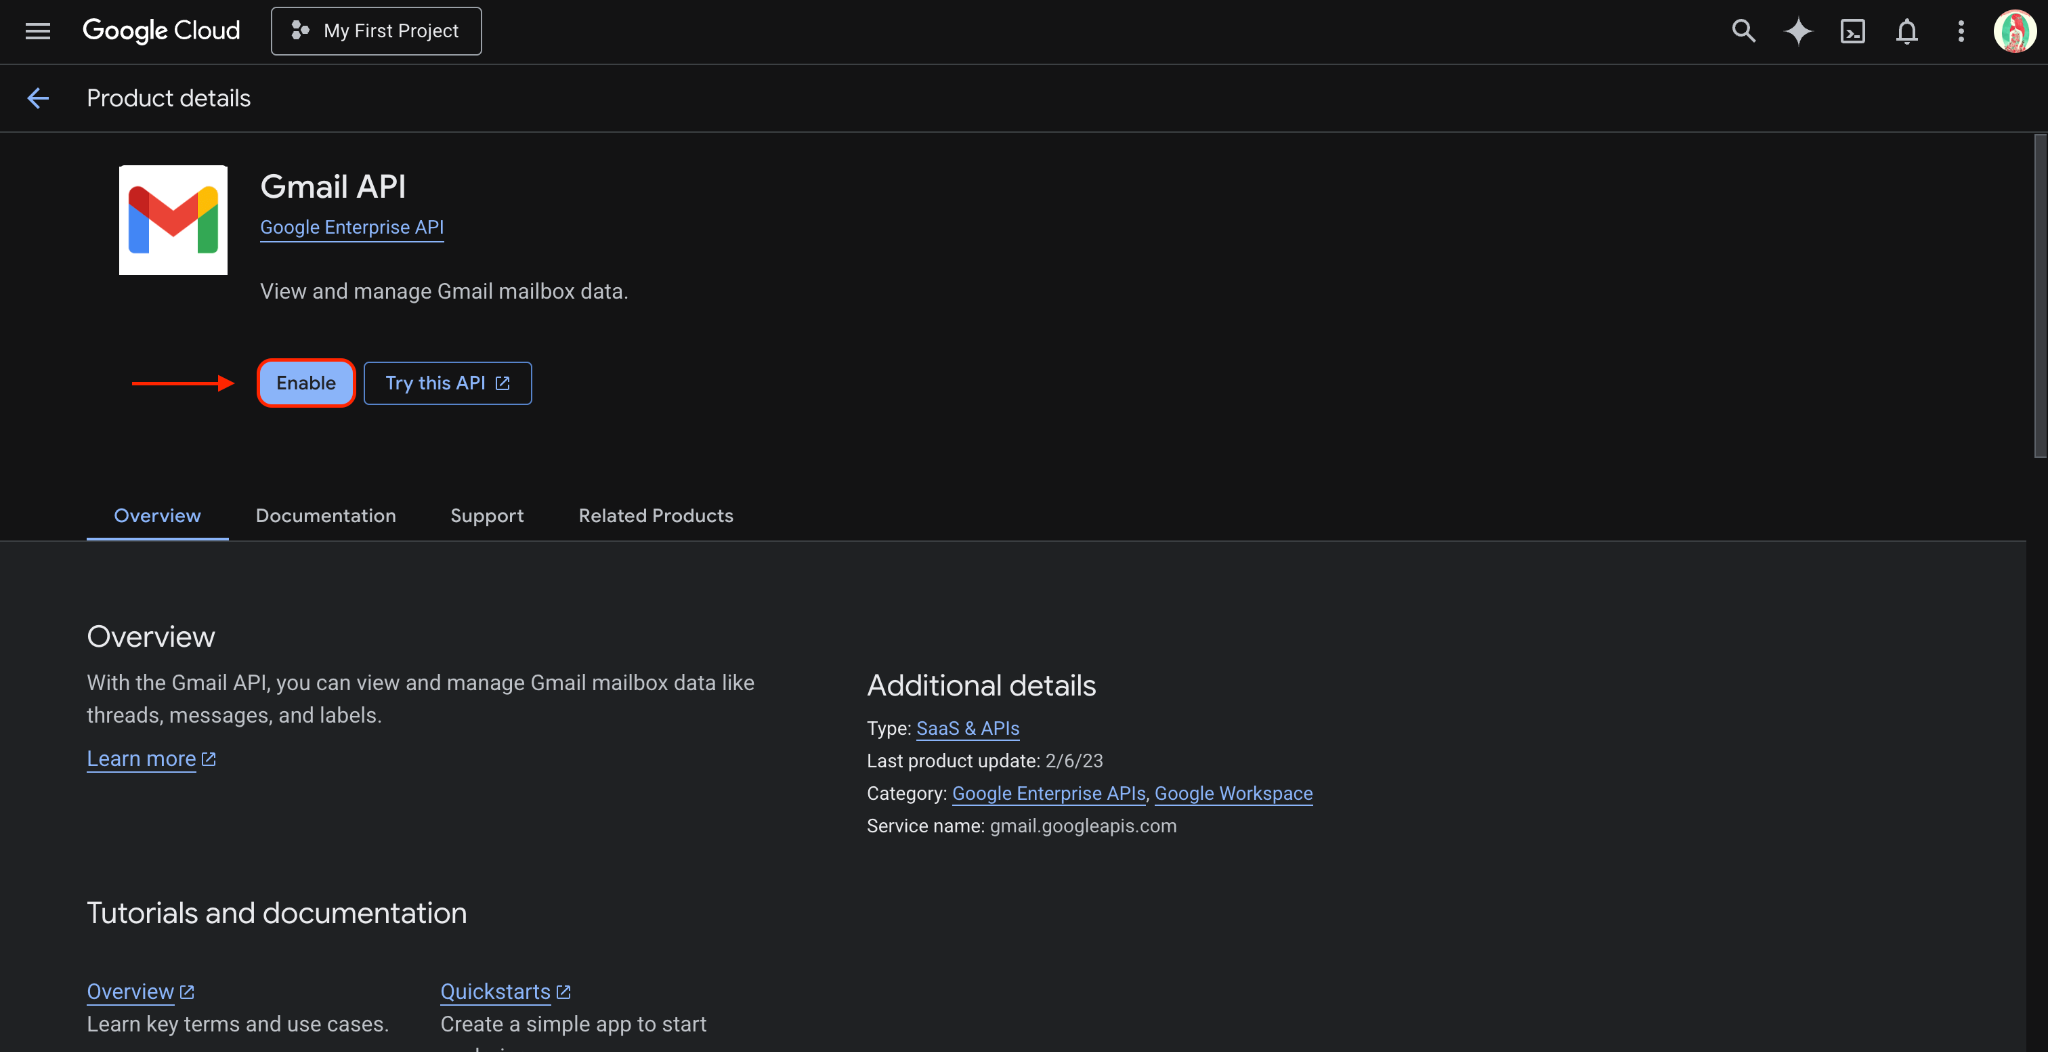
After creating the project, enable the Gmail API.
The usual path is:
Google Cloud Console → APIs & Services → Library → Gmail API → Enable

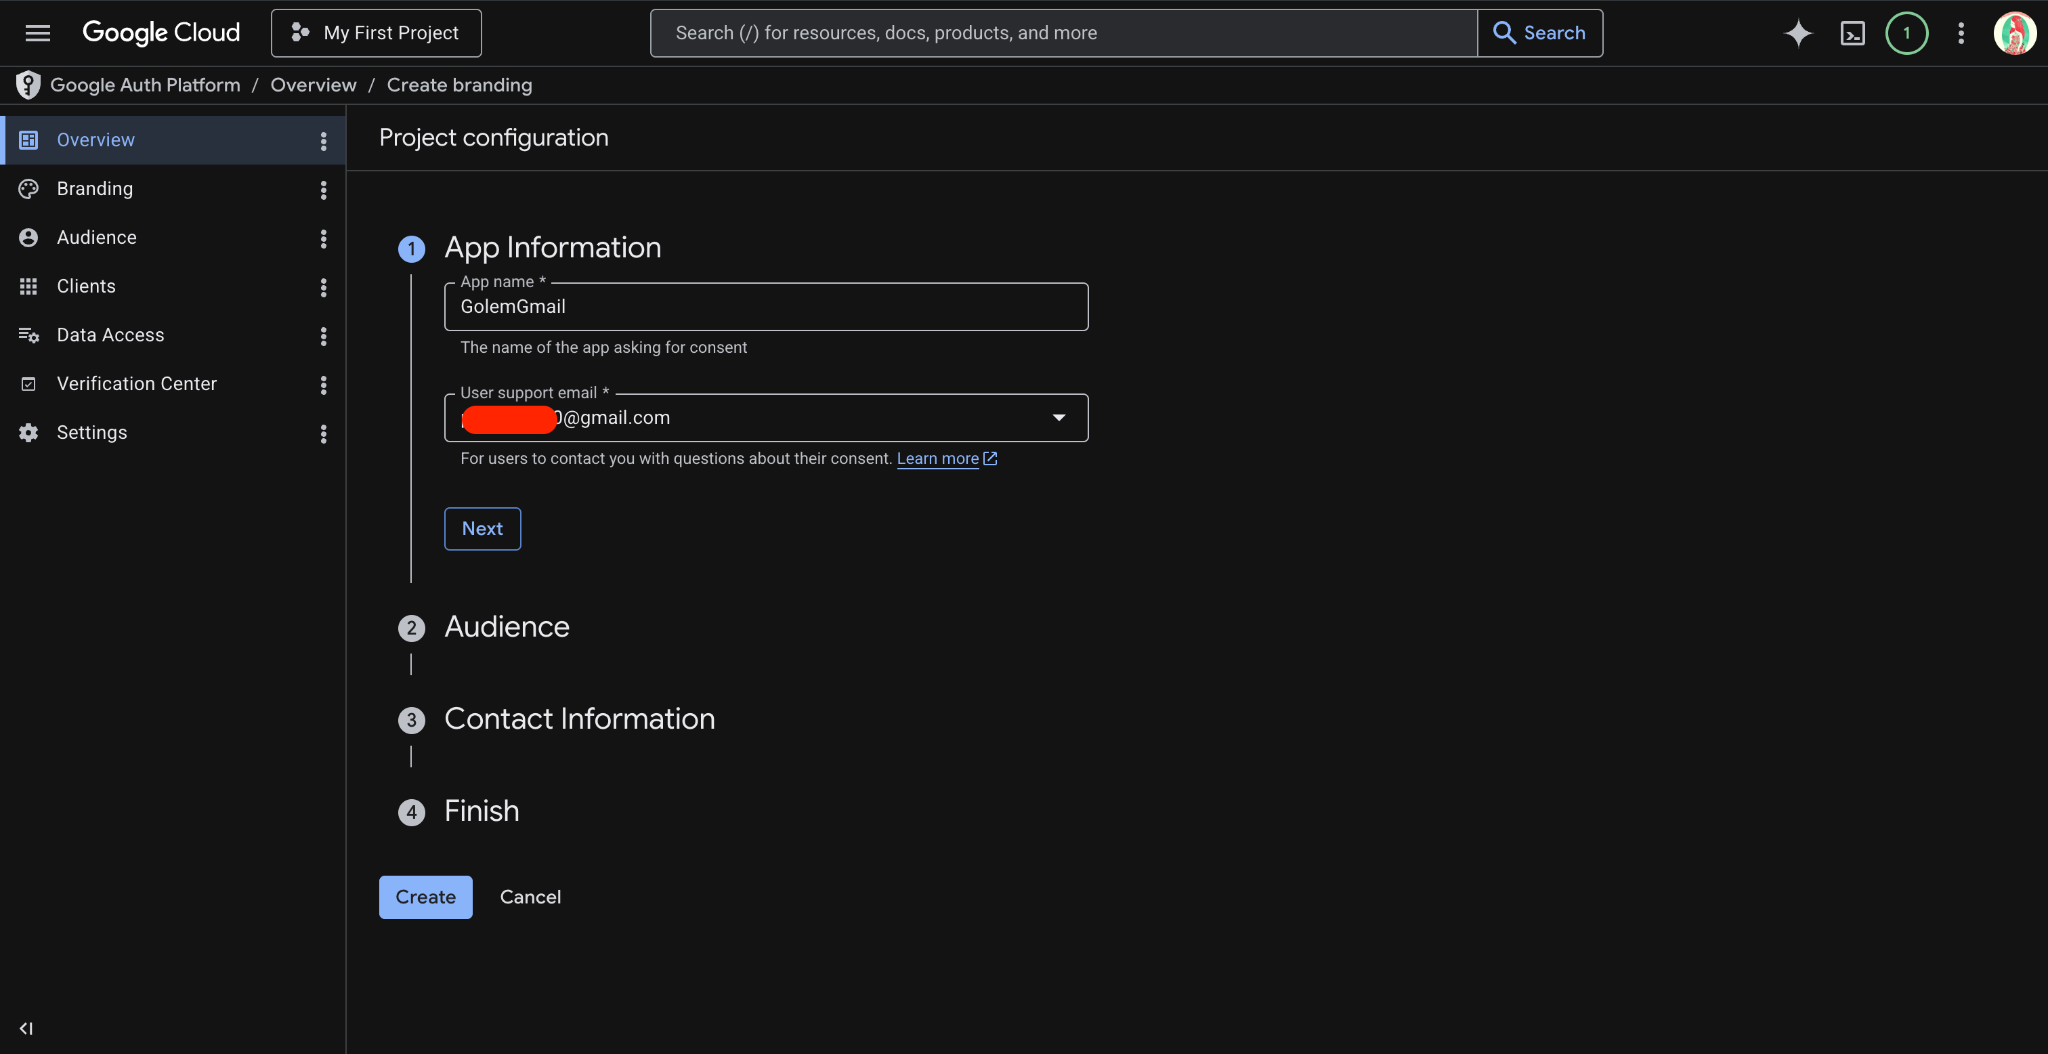
Step 2. Configure the OAuth Consent Screen
The OAuth Consent Screen is the screen Google shows to the user when granting access to an application.
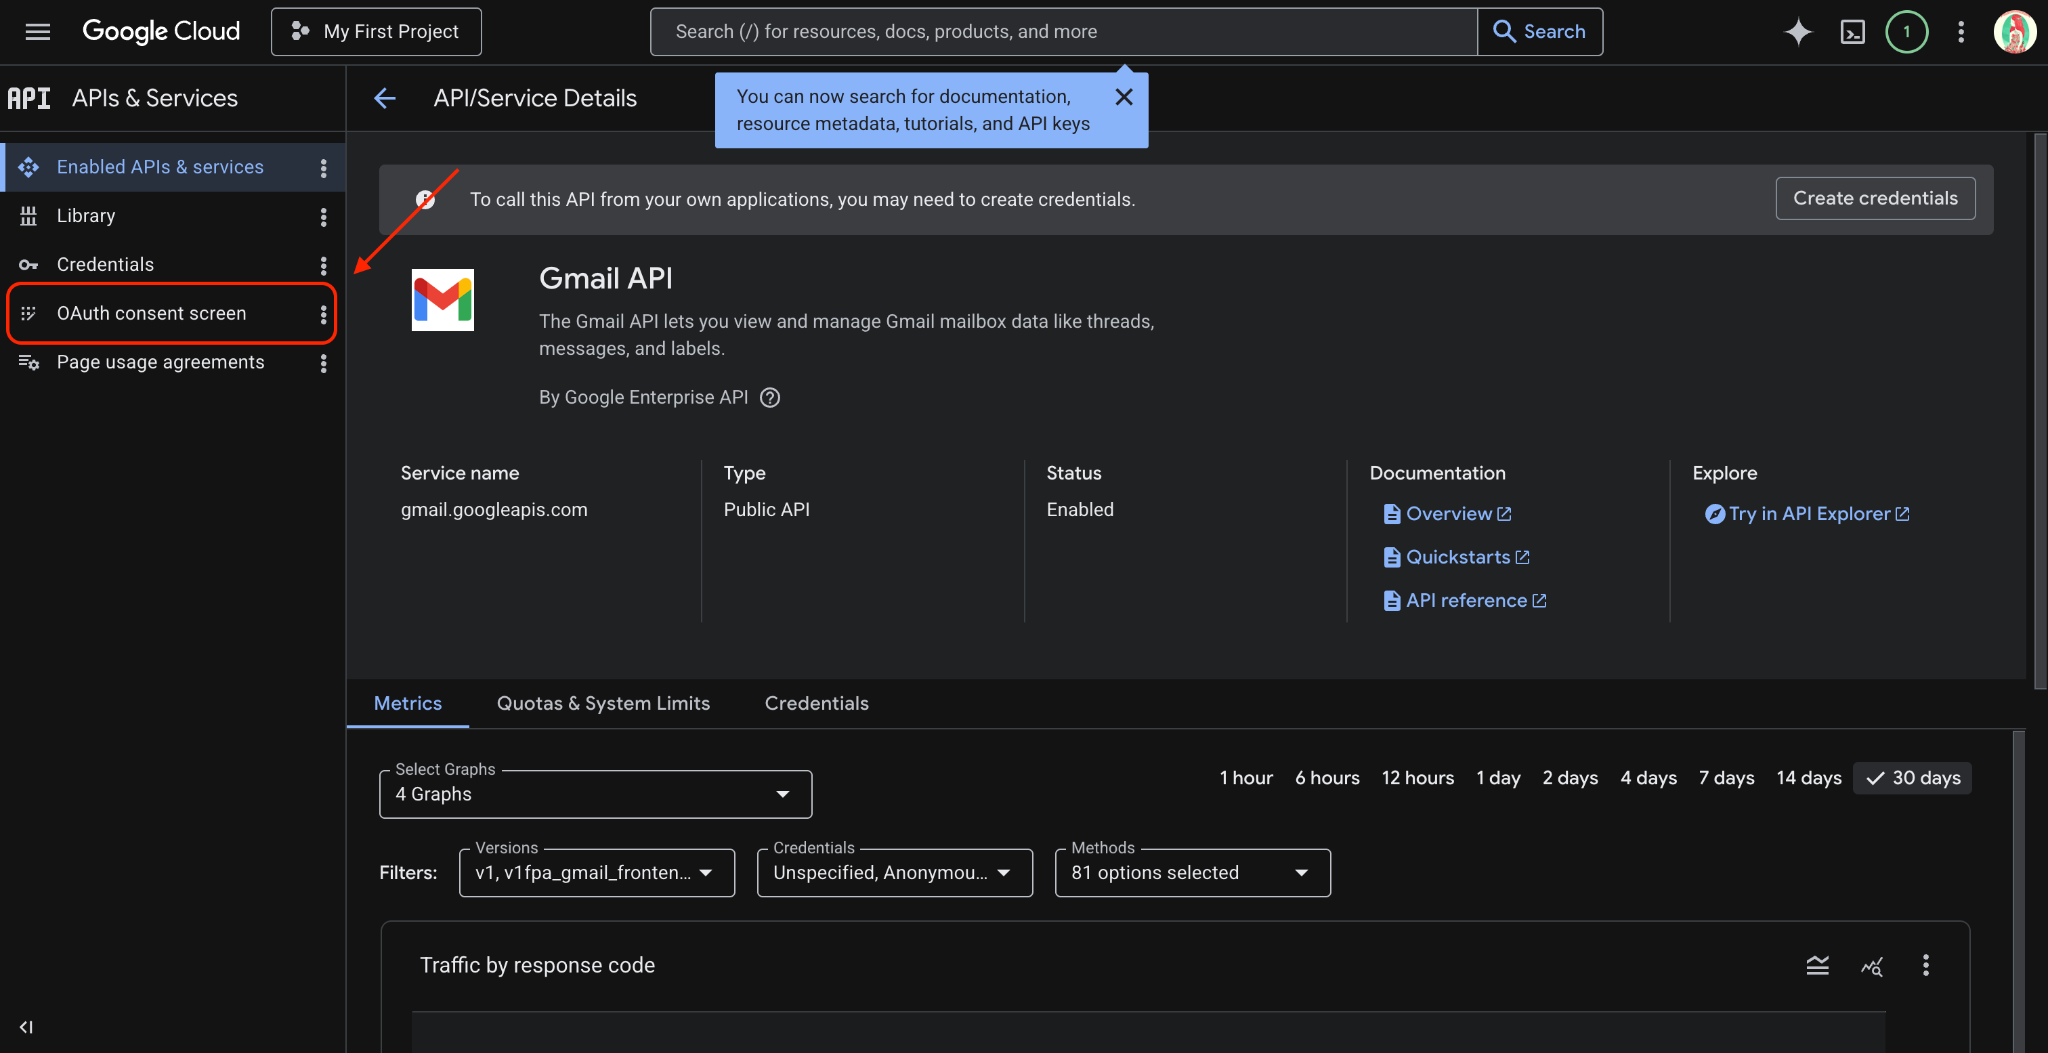
For a test connection, you can use Testing mode.
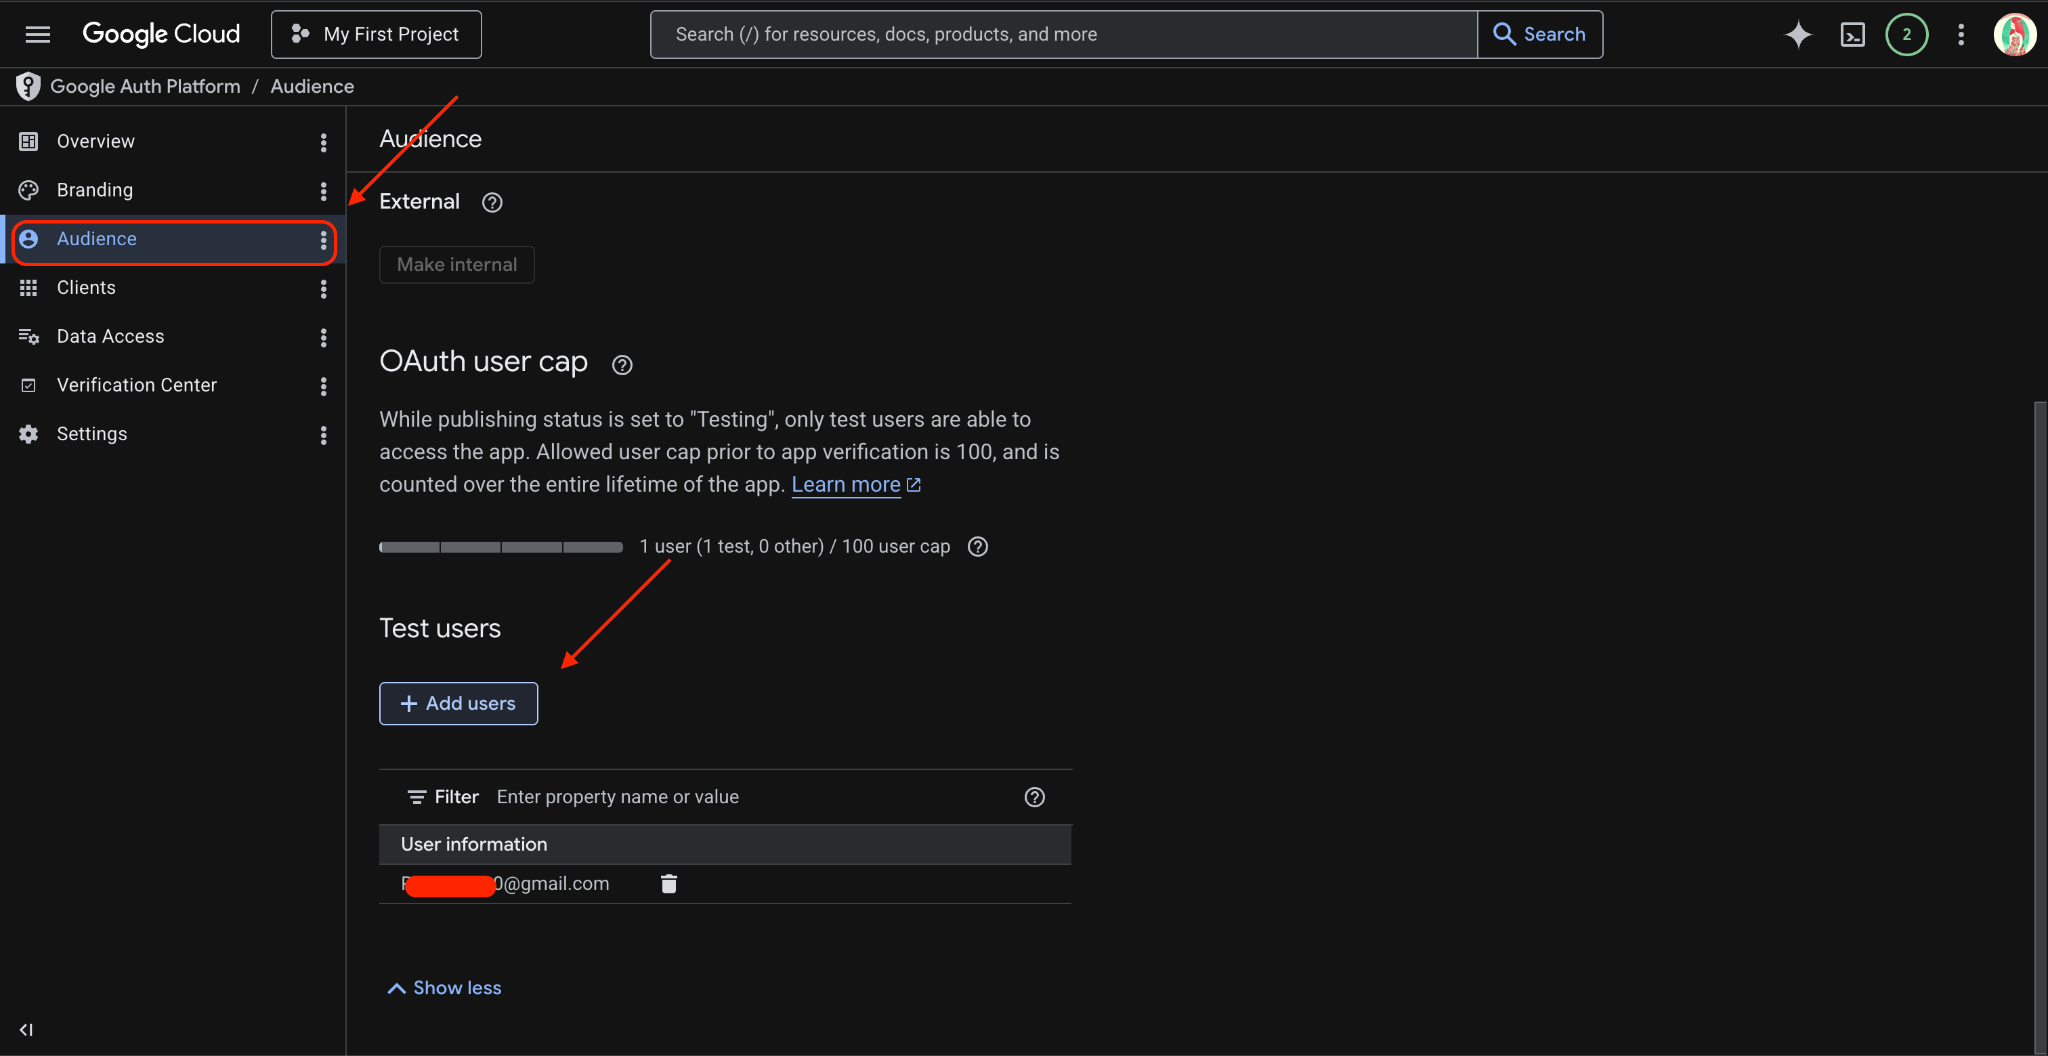
If the application is in Testing mode, make sure to add your Gmail address to the Test users list. Otherwise, Google may block authorization with an access error.
At minimum, check:
- Publishing status: Testing
- User type: External
- Test users: your Gmail address
If you see this error during authorization:
Access blocked: app has not completed the Google verification process

Error 403: access_denied
it means the application is in Testing mode and the selected Gmail account has not been added to Test users.
Solution:
Google Cloud Console → APIs & Services → OAuth consent screen → Audience / Test users → Add users → add the Gmail account you are connecting
After that, you need to generate a new authorization URL. The old link will no longer work.
If you are connecting a personal email inbox, it is better to use a separate test Gmail account rather than your main work mailbox.
Step 3. Create an OAuth Client JSON file
Next, create an OAuth Client ID.
Path:
APIs & Services → Credentials → Create Credentials → OAuth client ID
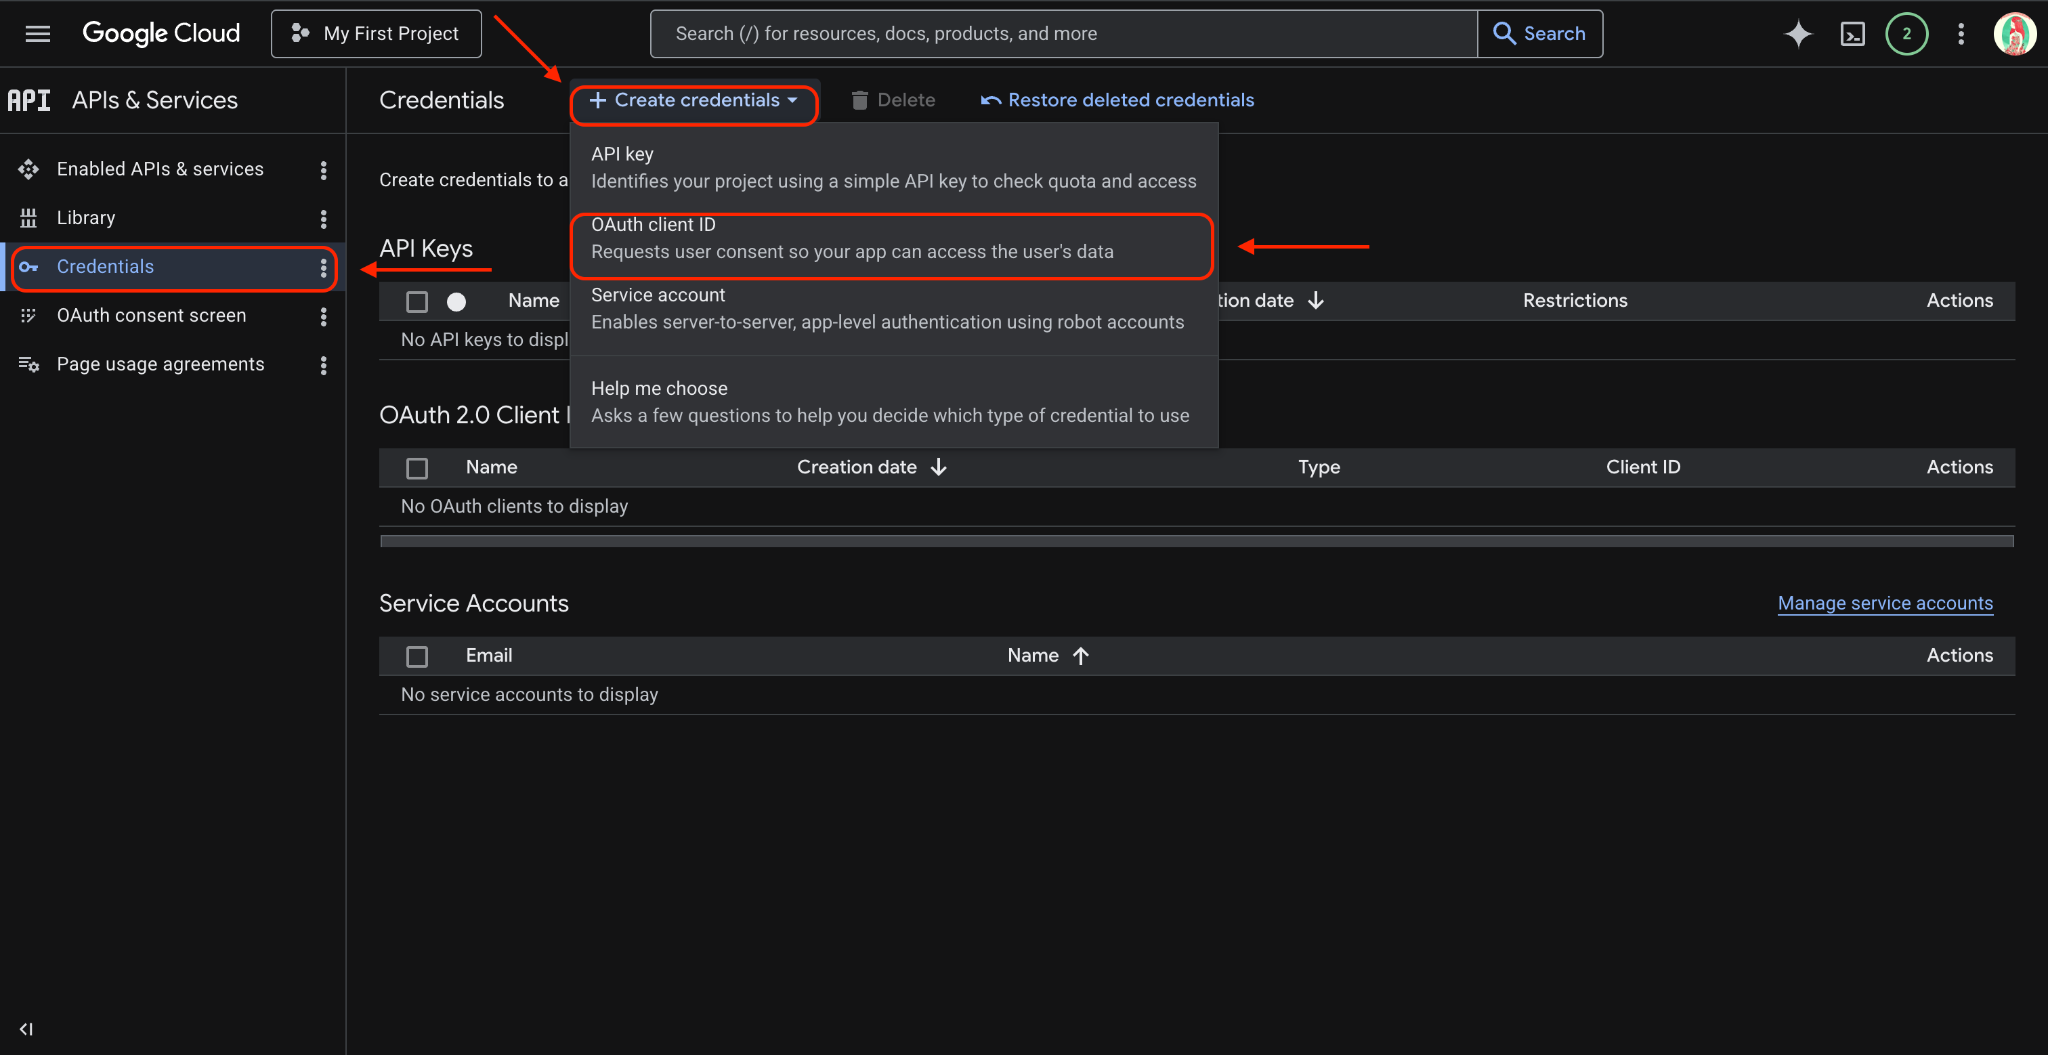
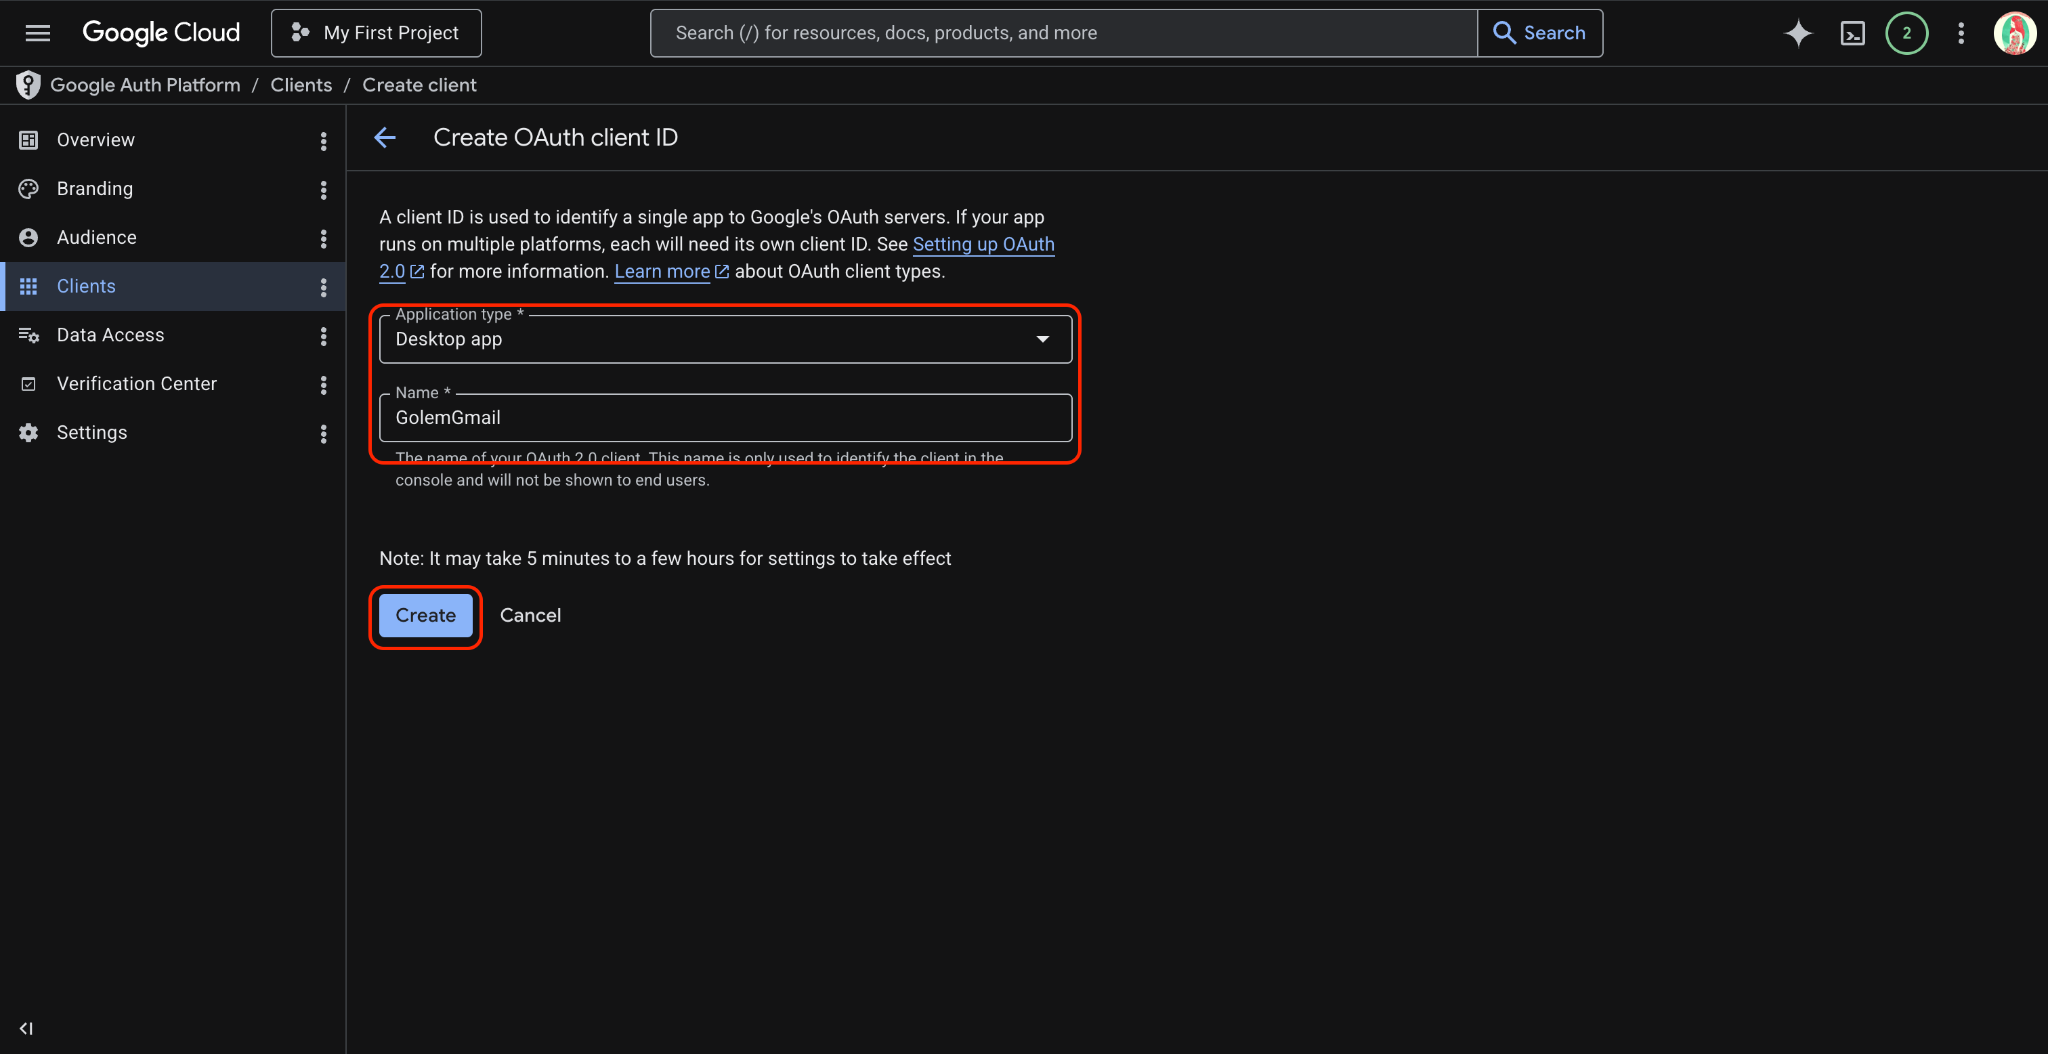
The best application type to choose is:
Desktop appThe name can be anything, for example:
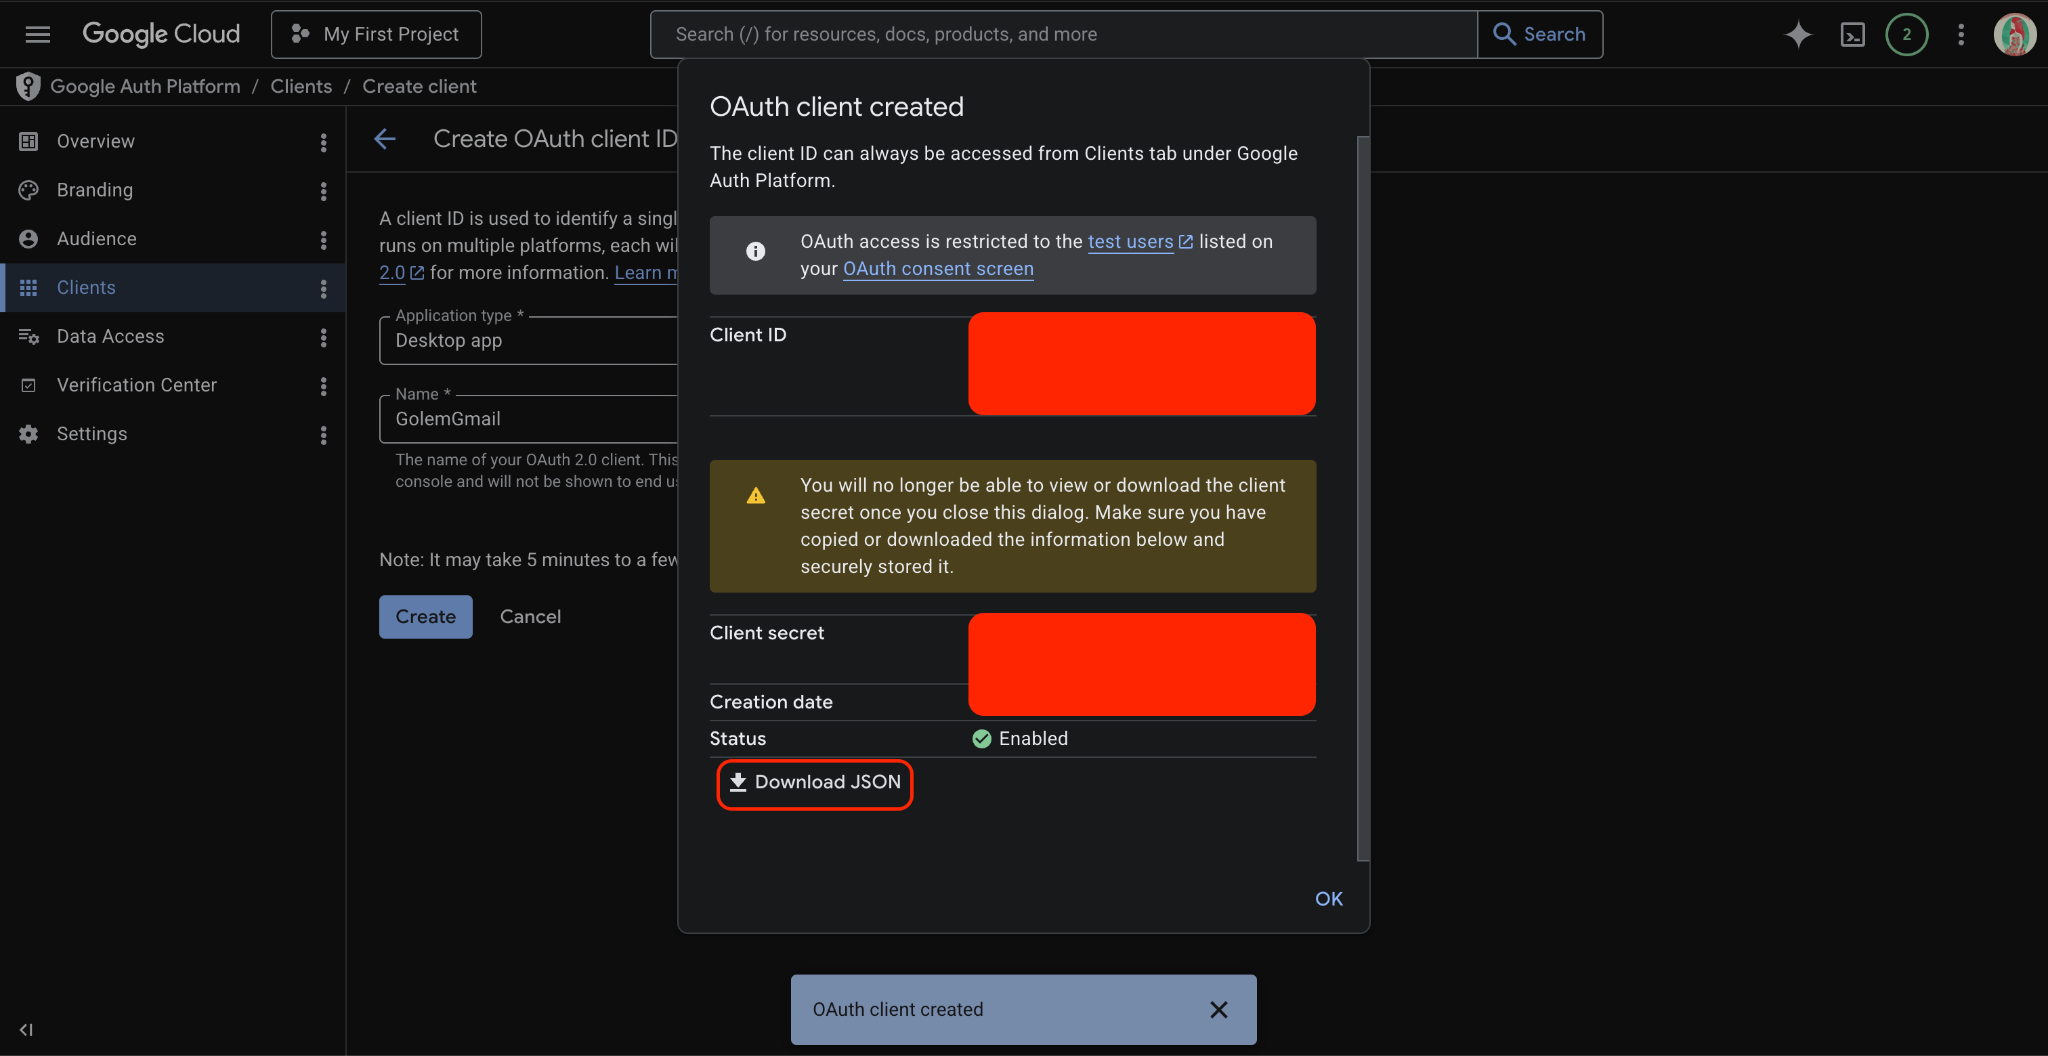
OpenClaw Gmail AutomationAfter creation, Google will let you download a JSON file. This is the OAuth Client JSON file that you later pass to OpenClaw / gog.
Step 4. Transfer the OAuth JSON file to the OpenClaw environment
If you have terminal access, you can save the file on the server, for example here:
~/.config/openclaw/secrets/google-oauth-client.jsonAfter that, gog must receive the credentials:
gog auth credentials ~/.config/openclaw/secrets/google-oauth-client.jsonIf you are working only through a Telegram chat with an OpenClaw agent, you need to send the JSON file to the agent and ask it to save the file on the server.
Example command for the agent:
Save this OAuth Client JSON to:
~/.config/openclaw/secrets/google-oauth-client.json

After that, run:
gog auth credentials ~/.config/openclaw/secrets/google-oauth-client.json
Step 5. Configure the keyring password before OAuth
On a headless server, gog may fail to save the refresh token if it needs a keyring password and there is no interactive terminal. This often happens when OpenClaw works through Telegram: the agent can run commands, but cannot manually enter a password into an interactive prompt.
That is why you should create a password for the file keyring before starting OAuth:
mkdir -p ~/.config/openclaw/secrets
chmod 700 ~/.config/openclaw ~/.config/openclaw/secrets
if [ ! -f ~/.config/openclaw/secrets/gog_keyring_password ]; then
  openssl rand -base64 48 > ~/.config/openclaw/secrets/gog_keyring_password
fi
chmod 600 ~/.config/openclaw/secrets/gog_keyring_password
Before every gog call in a headless/Telegram environment, set:
export PATH="$HOME/.local/bin:$PATH"
export GOG_KEYRING_BACKEND=file
export GOG_KEYRING_PASSWORD="$(cat ~/.config/openclaw/secrets/gog_keyring_password)"
If you do not do this, OAuth may complete successfully, but the refresh token may not be saved.
After configuring the keyring, you can connect the OAuth Client JSON file:
gog auth credentials ~/.config/openclaw/secrets/google-oauth-client.jsonStep 6. Start Gmail OAuth through the remote flow
If OpenClaw is running on a server, the usual interactive OAuth flow may not work. For example, the CLI may wait for manual terminal input while the user is working through Telegram.
In this case, it is better to use the remote two-step flow.
First, the agent generates a Google authorization URL:
export PATH="$HOME/.local/bin:$PATH"
export GOG_KEYRING_BACKEND=file
export GOG_KEYRING_PASSWORD="$(cat ~/.config/openclaw/secrets/gog_keyring_password)"
gog auth add your@gmail.com --services gmail --remote --step 1
After that, the agent sends you the Google authorization URL.
You open the link, choose the Google account, and confirm access.
At the end, the browser may open a page like this:
http://127.0.0.1:41881/oauth2/callback?state=...&code=...If the page shows “site can’t be reached” or “ERR_CONNECTION_REFUSED,” that is normal.
OpenClaw is running on the server, while the browser is open on your computer or phone. Therefore, 127.0.0.1 points to your local device, not the server.
In this scenario, the page does not need to open successfully. You just need to copy the full URL from the browser address bar and pass it to gog remote step 2.
Then the agent completes authorization:
export PATH="$HOME/.local/bin:$PATH"
export GOG_KEYRING_BACKEND=file
export GOG_KEYRING_PASSWORD="$(cat ~/.config/openclaw/secrets/gog_keyring_password)"

gog auth add your@gmail.com --services gmail --remote --step 2 --auth-url 'FULL_REDIRECT_URL_HERE'
It is important to complete the second step immediately. OAuth code and state are valid for a limited time. If you wait too long, you will need to run remote step 1 again and get a new authorization URL.
Step 7. Verify that Gmail is connected
After successful authorization, verify that the token works:
export PATH="$HOME/.local/bin:$PATH"
export GOG_KEYRING_BACKEND=file
export GOG_KEYRING_PASSWORD="$(cat ~/.config/openclaw/secrets/gog_keyring_password)"
gog auth list --check
gog auth doctor --check
Then you can run a safe Gmail test:
gog gmail search 'newer_than:7d' --max 5 --jsonIf the command returns recent emails, Gmail is connected correctly.
If gog auth doctor shows a warning about a missing config.json, but auth list works, the refresh token is valid, and gmail search returns emails, that warning can be treated as non-blocking. You do not need to run onboarding or reset only because of this warning.
Step 8. Verify that the setup survives a new session
After successful authorization, it is important to make sure that gog will work not only in the current shell session.
The problem may look like this: everything works during setup, but after restarting OpenClaw or starting a new Telegram session, the agent again cannot see gog, the keyring, or the Gmail token.
Minimum check:
export PATH="$HOME/.local/bin:$PATH"
export GOG_KEYRING_BACKEND=file
export GOG_KEYRING_PASSWORD="$(cat ~/.config/openclaw/secrets/gog_keyring_password)"

which gog
gog --version
gog auth list --check
gog gmail search 'newer_than:7d' --max 5 --json
If OpenClaw runs as a systemd service, these environment variables need to be added to the environment file or startup configuration of the service.
For example:
PATH=/home/openclaw/.local/bin:/usr/local/bin:/usr/bin:/bin
GOG_KEYRING_BACKEND=file
GOG_KEYRING_PASSWORD=your-generated-keyring-password
Do not store this password in a public repository. It should exist only in the server’s secret/environment configuration.
The main check: the gog command must work in the same environment where the OpenClaw agent runs, not only in a separate manual SSH session.
What you can automate after connecting Gmail
Once Gmail is connected, the AI agent can perform real work scenarios.
1. Daily inbox summary
The agent checks new emails for the day and groups them:
- important emails;
- clients and leads;
- finance and invoices;
- security alerts;
- promotions and noise;
- emails that require a reply.
2. Reply drafts
The agent can read an email, understand the context, and prepare a reply draft.
Safe mode: the agent creates a draft, but does not send the email without confirmation.
3. Search for important emails
You can ask:
Find all emails from Google Ads from the last 30 days and briefly explain which ones contain important notifications.
Or:
Check whether there were any payment error emails, security alerts, or important account change notifications this week.
4. Recruiting automation
If you are looking for a job or processing candidates, the agent can track:
- replies from companies;
- emails from hh.ru / LinkedIn;
- interview invitations;
- follow-up emails;
- deadlines and unread replies.
5. Lead generation and sales
For a business, the agent can find inbound requests, classify them, and prepare next actions:
- hot lead;
- cold lead;
- price request;
- follow-up needed;
- email can be ignored;
- reply needed today.
The main security rule
You should not immediately give the agent permission to send emails.
The best starting mode is:
The agent can read, search, analyze, and create drafts. The agent cannot send, delete, or archive emails without confirmation.
This is especially important because Gmail may contain sensitive data: passwords, invoices, documents, personal conversations, bank notifications, and service alerts.
A minimal safe policy for the agent:
- Do not send emails without confirmation.
- Do not delete emails.
- Do not archive emails without confirmation.
- Do not change Gmail settings without confirmation.
- Show a summary before any action.
- Use safe mode for tests.
- Do not display full verification codes, recovery codes, or security tokens from emails. If such an email is found, the agent should write: “verification code email detected”.
Why manual setup is complicated
On paper, everything looks simple: create a JSON file, connect the API, complete OAuth.
In practice, problems often appear:
- the
gogskill is installed, but the CLI itself is not installed; - the Telegram agent cannot handle interactive input;
- the OAuth link expires;
- the user opens the redirect URL on
127.0.0.1and thinks something is broken, even though the URL simply needs to be copied; - Google blocks the account if it has not been added to Test users;
- the keyring requires a password, but there is no TTY;
GOG_KEYRING_PASSWORDis set too late — after OAuth, when the refresh token has already failed to save;- the token is saved in the current shell session, but disappears after restart;
- OpenClaw is installed, but does not have access to the required environment variables;
gogis configured under one Linux user, while OpenClaw runs under another;- the agent can read Gmail, but has no safety rules.
That is why Gmail automation is not just “connect the API.” It is a combination of Google Cloud, OAuth, OpenClaw, gog, token storage, server environment, and safety rules.
How GolemWorkers makes this easier
If you want to automate Gmail but do not want to manually set up a server, install OpenClaw, fix the CLI, configure OAuth, keyring, and the environment, you can use a ready-made environment.
With GolemWorkers, you can run AI agents in prepared infrastructure. This means you do not need to start by configuring a server and environment from scratch. You can move faster to the main task: create an agent, connect the required tools, and configure the workflow.
For example, a Gmail agent can help you:
- process incoming emails;
- find important messages;
- prepare reply drafts;
- track leads;
- check service notifications;
- create daily summaries;
- help with work follow-ups.
Instead of spending hours on installation and debugging, you can run an agent in a ready-made environment and focus on the workflow.
Conclusion
Gmail automation through OpenClaw works, but it requires the right architecture.
You need to understand three things:
- Gmail is not connected through a regular API key — it requires a Google OAuth Client JSON file.
- OpenClaw must have the
gogCLI installed and access to token storage. - The agent needs restrictions: reading and creating drafts is fine, but sending and deleting should happen only after confirmation.
If everything is configured correctly, Gmail turns from a chaotic inbox into a manageable workflow. An AI agent can find what matters, reduce manual work, and help you respond to emails faster.
And if you do not want to build the whole infrastructure manually, you can use the ready-made environment on GolemWorkers and launch your agent faster.